|
TUCIT-X
TUCIT-X MENUS
TUCIT-X BATTERIES
TUCIT XTRAS
|
TUCIT-X Menus |
|
|
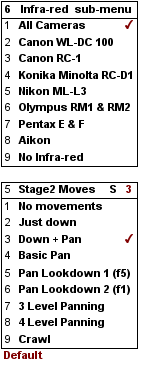
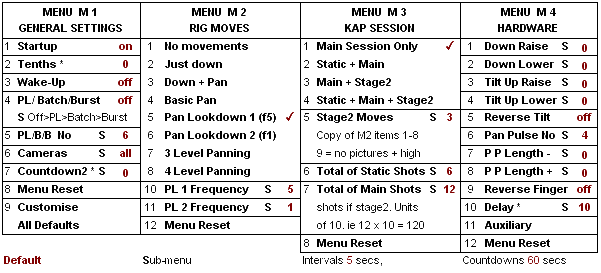
1 General Settings Menu
providing all the basic Tucit interval timer options including picture limits a batch mode and a burst mode. This menu also enables infra-red selection for individual camera controllers (see submenu) and the ability to customise the default settings of all menus as well as interval and countdown times. | |
|
2 Rig Moves Menu
for rigs utilising infrared shutter control and having both pan and tilt servos. This menu offers:-
None - no servo activity
-
Simple Straight Down
-
Straight Down And Rotating
-
Simple Adjustable Pan in Up Position
-
Pan + One Vertical Look Down every 5 pan moves
(The number '5' can be custom set) -
Pan + A Look Down after every pan move
(As above the lookdown frequency can be custom set) -
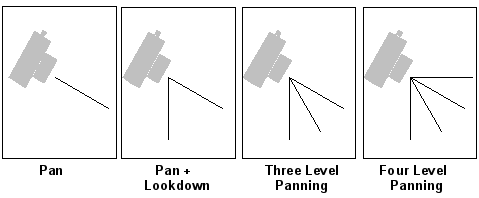
3 level panning (adjustable declinations ie 30°, 60° & 90°)
-
4 level panning (adjustable declinations ie 0°, 30°, 60° & 90°)
| |
 |
|
3 Kap Session Menu
advanced options if required, able to provide-
Countdown Delay Stage (Optional)
This allows your kite to gain height before picture taking starts. -
Static shots Stage (Optional - default off)
This allows you to manually point your camera towards a target before the rig goes up. This could be a landmark or yourself at the bottom of the line. You can set the number of pictures to be taken before the servos begin moving the rig. -
Main Stage
The basic activity you set with the Rig Moves Menu. -
Stage2 (Optional - default off)
This allows you to access a Stage2 Moves sub-menu (see right) and with it to operate your rig two different ways during a single session. For example your main stage could be to take high level omnidirectional landscape shots using Rig Moves Menu's 4 Level Panning. You could set a 100 picture limit to this giving yourself two full revolutions and then, using the Second Rig Moves Menu, set your rig to take all subsequent pictures Straight Down And Rotating in order take low level overhead shots of people or down chimneys, etc.
-
Alternatively you can use Stage2 to have your camera stop taking pictures and tilt itself upwards all ready for a safe landing.
| |
|
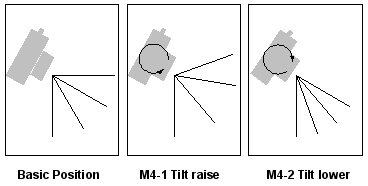
4 Hardware Menu
providing all the options required to adjust the actions and movements of your servos. As an example tilt adjustments are illustrated below. | |
 |
| For full details please read the manual |
|
|
| |